Congratulations on your Magic Cube Aura. This guide will take you through plugging in your device and configuring it for use with your controller.
The Magic Cube Aura is device aimed an the home automation market to help harness the power of the open source community and connect it to Home Automation platforms such as Elan and Control 4. This device is only sold to dealers and cannot be purchased retail. To find a home automation professional in your area, reach out to your local automation resource.
The Magic Cube runs a few home automation platforms and some special scripts to make it all work seamlessly with Nice (Elan) Control systems.
2. Plugging It All In
The Magic Cube has several options depending on what your ordered. If you purchased the wireless options.
Attach the WiFi Antennas (if any)
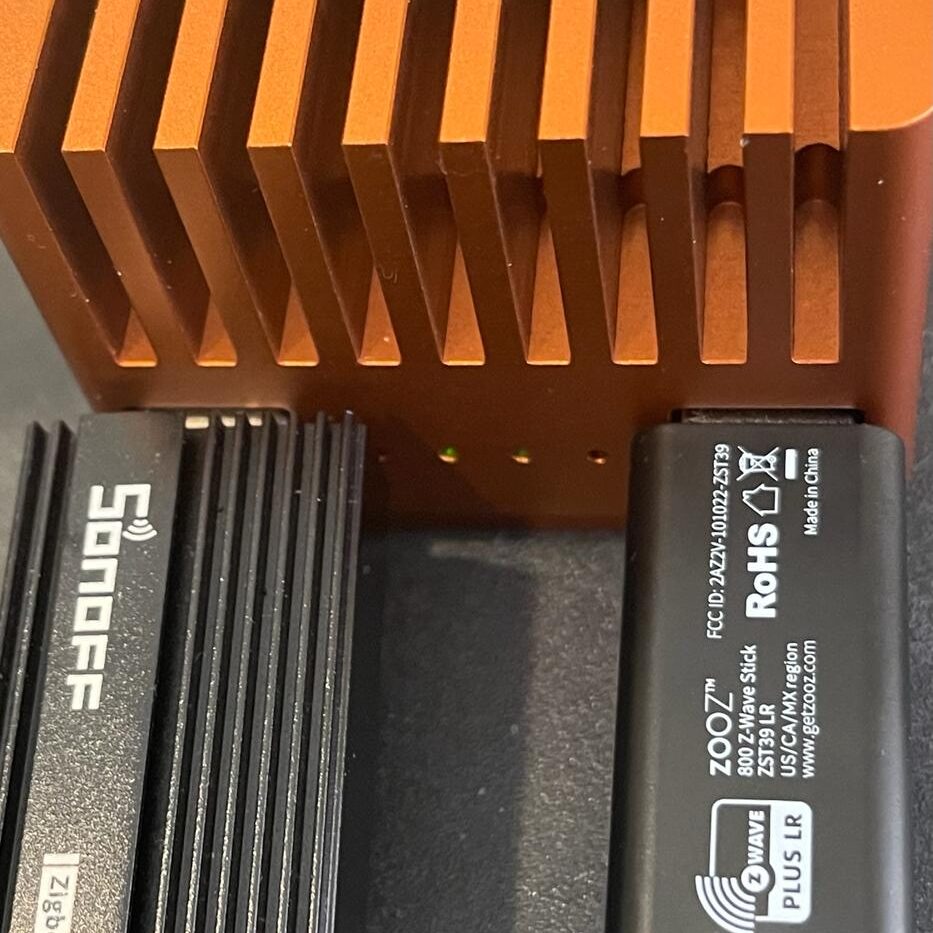
Attach the ZWave Adapter (if any)
Attach the Zigbee Adapter (if any)
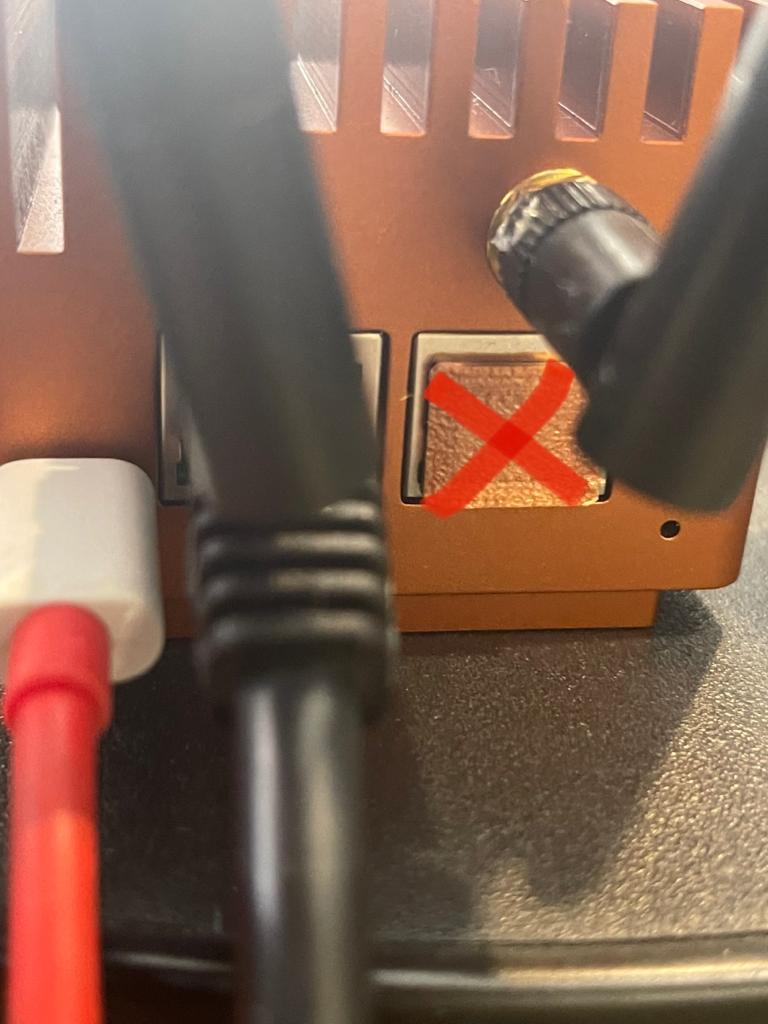
Attach network cable. The Magic Cube Aura has two network ports. One is blocked off with an Orange tab. DO NOT use this port. The Magic Cube Aura will not recognized this connector. This is reserved for future use.
Attach HDMI cable (this is optional and not required to operate the cube). The HDMI output is used for local console access. You will need a keyboard and mouse to login. If you don’t have any more USB ports available, use a port splitter (not included)
Finally, attach the power cable included. Do NOT use another power supply. This power supply was specifically designed for the Magic Cube to give it enough power to run.
Device will self boot. It will take a full 3 minutes to be available on the network. Patience…..
3. Configuration
The Magic Cube Aura has been designed and programmed from the ground up to make it easy to setup. Please note the following changes from the first generation Magic Cubes
The Magic Cube Aura has been pre-configured with user accounts and tokens.
The default user and password are provided separately
Use this to log into
Home Assistant
Terminal
Dashboard Menu
Homebridge (if configured)
Remote Desktop
Any other required service for logon
Root account is no longer valid
Home Assistant has already been onboarded and loaded with all the most popular libraries including HACS
In the event that you reset home assistant and need to onboard again, follow this guide
Token has already been generated and added to the Cube. You DO NOT need to generate a token.
The Drivers will automatically pick up the Cube and its tokens when installed. No need to split tokens anymore.
3.1 Initial Setup
From any web browser access the menu of the Magic Cube Aura. You can access it as follows
If you network allows discovery type:
http://magiccubeaura.local
If not, find the ip address that was assigned to it and use, for example:
http://192.168.0.100
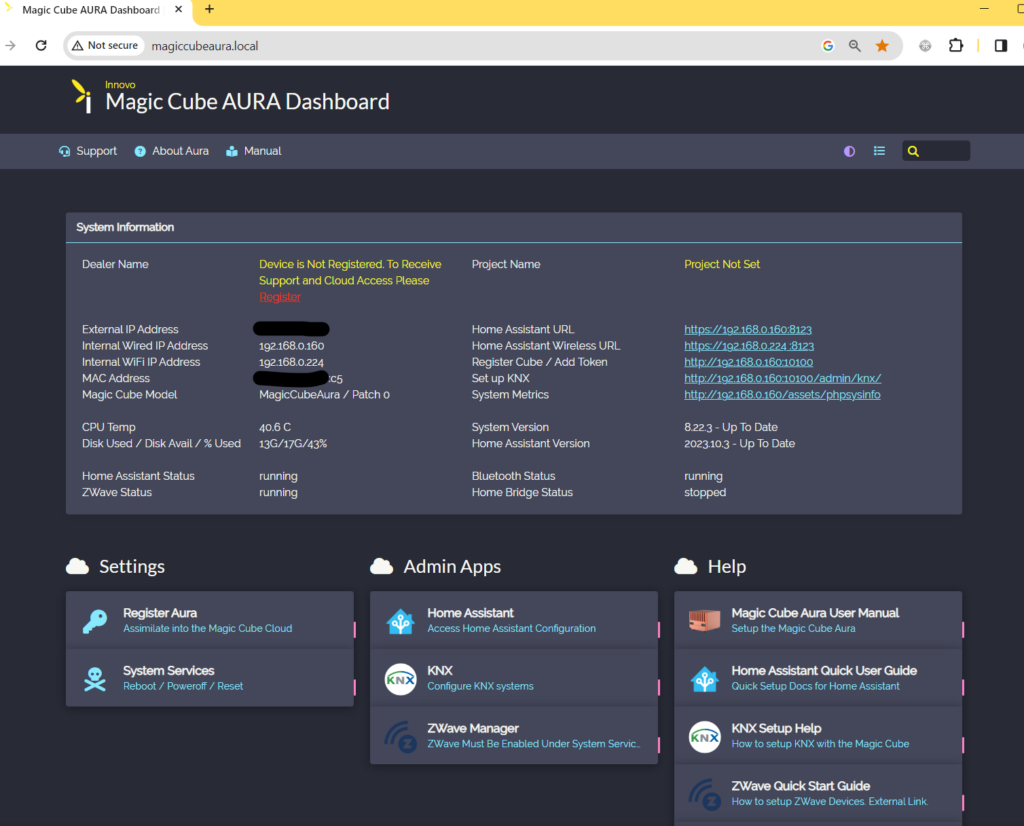
The Dashboard offers several areas
System Information that includes the health / version / ip address / system services / software versions.
Links to access services via IP address in case the menu options with the hostname are not accessible
It’s important to register the Cube. This will give Innovo access to update and maintain your cube via our private cloud. This will also allow you to access your Magic Cube using our cloud once that service is opened to dealers.
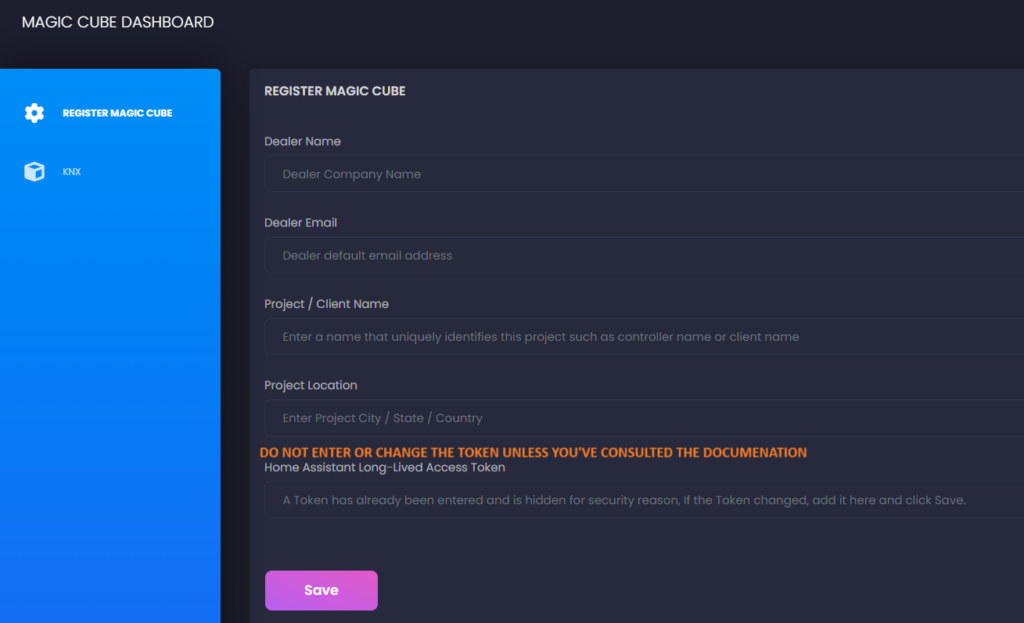
Click on Register Cube.
The Token has already been added at the factory. DO NOT enter a new token unless you read the section below about changing tokens and passwords..
Add Your Email, Name, Project Name and Project Location and hit save.
3.3 Access Terminal Console
To Access Terminal Console to administer the Magic Cube’s Operating System, follow these steps.
From the Main Menu, Choose System Services
You will be required to login. Login with the credentials provided to you when you received the cube. Select Terminal
Login to Terminal. You will need to use your credentials again.
Once you login, type:
sudo dietpi-config
then enter, then type your password again, then enter. For Security reasons, password cursor will not move as you type but it’s being registered as you type.
7. Choose the desired configuration item (you must use up / down / right / left keys at this point, the mouse will not work here.
For Detailed explanation of each item, use this reference link.
8. Use the up / down key to choose the configuration menu item
18. Once done, the system will always come back to the last screen. Then Choose <Back> then <Exit>. Choosing <OK> will have you repeat the process instead of exit and save.
3.4 Setting up LAN
We highly recommend that you setup a DHCP reservation for the Magic Cube. This will make it easier to move the Cube if needed and setup some services.
If you need a static reservation please use this guide and then confirm that all your services are working properly.
then enter, then type your password again, then enter. For Security reasons, password cursor will not move as you type but it’s being registered as you type.
Use the up / down key to choose the LAN adapter, then use tab to highlight OK then enter key.
Follow the prompts to setup connection.
3.5 Setting Up WiFi
If your Magic Cube Aura is factory equipped with a WiFi adapter, use the following process to add it to a WiFi access point.
then enter, then type your password again, then enter. For Security reasons, password cursor will not move as you type but it’s being registered as you type.
8. Use the up / down key to choose the WiFi adapter, then use tab to highlight OK then enter key.
9. Select scan, then tab over to OK and then enter key.
10. Choose an open slot (usually the first one). If you want to connect to multiple WiFi points, repeat this process.
11. The system will scan your network for available WiFi access points.
12. Choose your point NOTE: If the search turns up nothing, repeat this process. If still nothing, disable / enable the WiFi adapter, then try again.
WARNING: DO NOT disable the WiFi adapter remotely, always do this local to the network and only if you also have an ethernet cable plugged in and activated for backup. If the WiFi is disabled you will lose the connection to be able to turn it back on again.
13. Choose the encryption method required by your WiFi (typically the default)
14. Enter the password then tab to OK
15. Verify the information on the next screen and tab over to DONE (Not to OK). If you click ok, you will be given the chance to remove and scan again.
16. Back on the final page, scroll down to APPLY then tab over to OK
17. Confirm one more time. The system will go back to terminal and apply the changes.
18. Once done, the system will come back to the last screen. Confirm that you are connected and have an IP address, then Choose <Back>, On the next screen <Back> again, then <Exit>.
4. Connecting to Elan
After you Register the Magic Cube. You will need to connect it to Elan to get the Username / Password. This can be done by adding an Input driver available below(You must have a dealer account and be logged into the site to download the driver).
DO NOT share, write or post this password anywhere. It’s always available to you by clicking on the Magic Reveal button on the bottom of the screen.
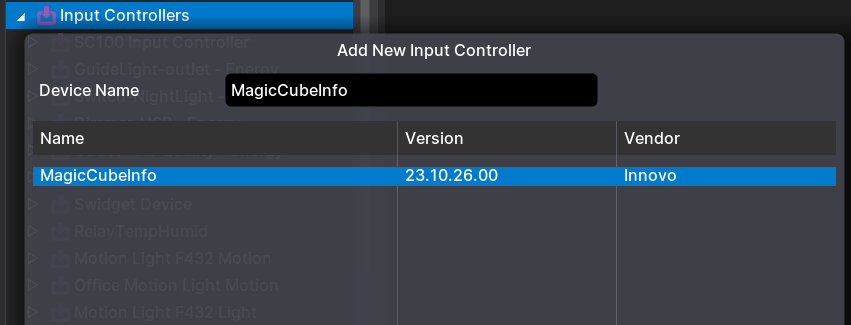
Install the driver using Sense Inputs –> Add New Input Controller.
Hit Discover, the Magic Cube will be automatically discovered and added.
Hit Magic Reveal, the password will be shown for 30 seconds. If the password is needed again, Click Magic Reveal again.
You cannot use this driver to change passwords.
Reach out to support@innovo.net if you wish to alter the system password.
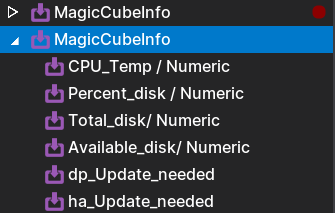
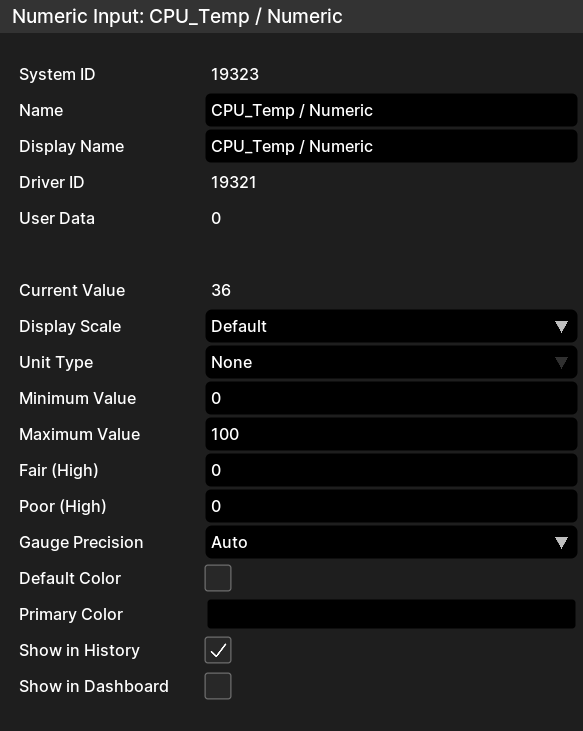
The Driver also has sensors about the health of the Magic Cube that can be used to trigger events.
A good trigger would be if the CPU temp reaches above 55C.
5. Setup Integrations in Home Assistant
Connect to the Home Assistant Interface using your web browser
If you’re local on the same LAN or logged in use the Magic Cube Aura’s local HDMI connection, open up any web browser and access the menu of the Magic Cube Aura. You can access it as follows
If not, find the ip address that was assigned to it and use, for example:
https://192.168.0.100:8123
Log in using the provided credentials
The Guide for Accessing the Cube Remotely using the Magic Cube Cloud will be provided when the service is launched.
5.1 Onboarding
Onboarding to Home Assistant (NOT Needed with the Magic Cube) (For Reference ONLY)
NOTE: Home Assistant on the MAGIC Cube has already been onboarded for the Cube’s Special uses. Only use this as a guide and only if instructed by Support.
This Manual is modified and customized from the original Home Assistant Documenation available here.
Enter the Home Assistant device’s address in your browser’s address bar
Typically, this is https://magiccubeaura.local:8123/
Ignore all browser SSL certificate warnings. This is a local site that uses a self issued SSL certificate. Choose Accept (Advanced, Accept) and Proceed.
If you are running an older Windows version or have a stricter network configuration, you might need to access Home Assistant at https://magiccubeaura.local:8123 or http://X.X.X.X:8123 (replace X.X.X.X with your device’s IP address).
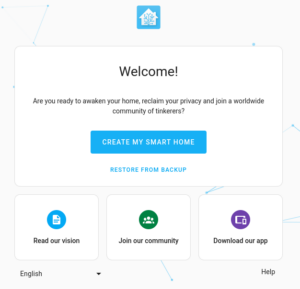
Result: You now see the welcome screen. Depending on your hardware, preparation may take a while.
With Home Assistant installed, it’s time to set up the basics.
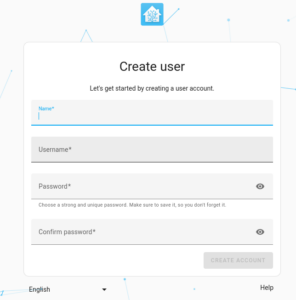
In this step, you will create the owner’s account of Home Assistant. This account is an administrator account. It will always be able to change everything.
If you want to restore from a backup of a previous installation, contact support@innovo.net.
If this is your initial installation, select Create my smart home.
Enter a name, username, and password. Select Create account.
We highly recommend keep this as the default username / password that was shipped with the Cube if you want to receive cloud based support.
IF THE NEXT STEP SEEMS STUCK AND DOESN’T MOVE TO THE NEXT STEP IN 5 SECONDS, CLICK THE REFRESH BUTTON IN YOUR WEB BROWSER AND CONTINUE
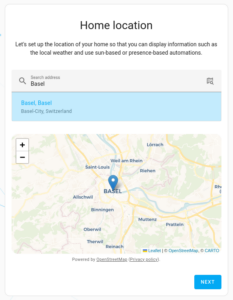
Enter the location of your home.
The location is used to populate settings such as time zone, unit system, and currency.
It is also used for location-based information and automations: for example showing the weather-forecast, opening the shades at sunrise, or starting the vacuum when you leave the home.
If you’d rather not send your location, you can choose a location far away from where you live.
You can always change this information later in the settings.
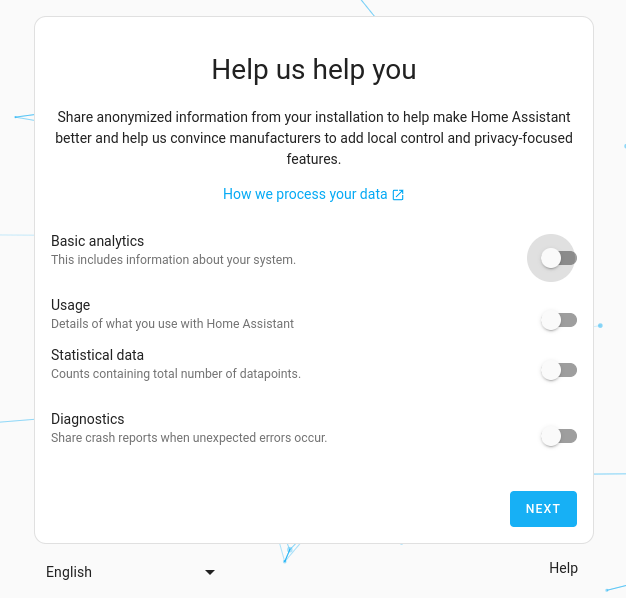
Select which information you are willing to share.
Sharing is disabled by default. However, we would like to encourage you to share some of this data.
This information helps us to find out which platforms we need to support and where to focus our efforts.
The data is anonymized and aggregated. To see the charts we generate out of this data, take a look at our analytics page
.
Once you are done, select Next.
Finally, select Finish.
Now you’re connected to the Home Assistant web interface. If some of your devices were discovered and setup automatically, this default dashboard may already show some of your devices.
5.2 Concepts
Concepts and terminology
Now you’re in Home Assistant, let’s go over important parts of Home Assistant and what they do.
Dashboards
By Default, The Magic Cube relies on Control systems for the UI and doesn’t use dashboards.
Dashboards are customizable pages to display information in Home Assistant. To learn more about dashboards, refer to the dashboard documentation.
Integrations
NOTE: Once you add the integration to Home Assistant, add the corresponding driver in your control system. For example, after install the Philips Hue integration in home assistant, install the Magic Cube Lighting Pro Driver in your controller, choose Philips and Install. This will import all your devices from the Magic Cube into your control System.
Integrations are pieces of software that allow Home Assistant to connect to other software and platforms. For example, a product by Philips called Hue would use the Philips Hue integration and allow Home Assistant to talk to the hardware controller Hue Bridge. Any Home Assistant compatible devices connected to the Hue Bridge would appear in Home Assistant as devices.
For a full list of compatible integrations, refer to the integrations documentation.
Once an integration has been added, the hardware and/or data are represented in Home Assistant as devices and entities.
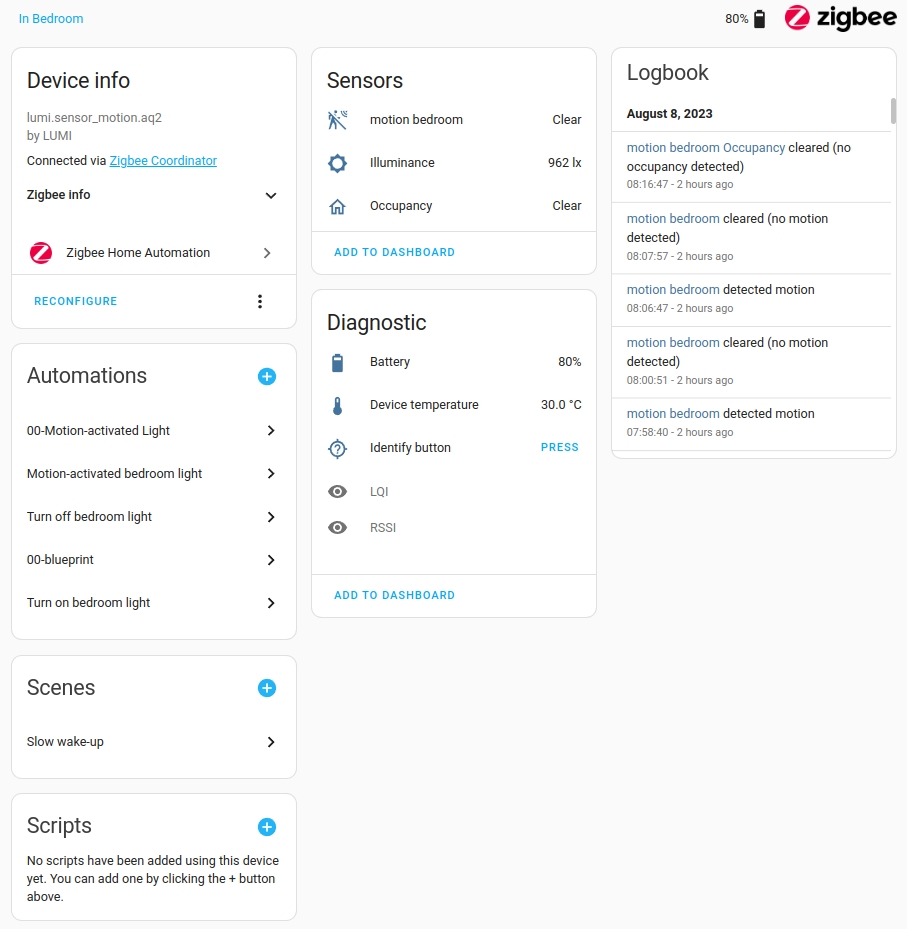
Devices & entities
Devices are a logical grouping for one or more entities. A device may represent a physical device which can have one or more sensors. The sensors appear as entities associated to the device. For example, a motion sensor is represented as a device. It may provide motion detection, temperature, and light levels as entities. Entities have states such as detected when motion is detected and clear when there is no motion.
Devices and entities are used throughout Home Assistant. To name a few examples:
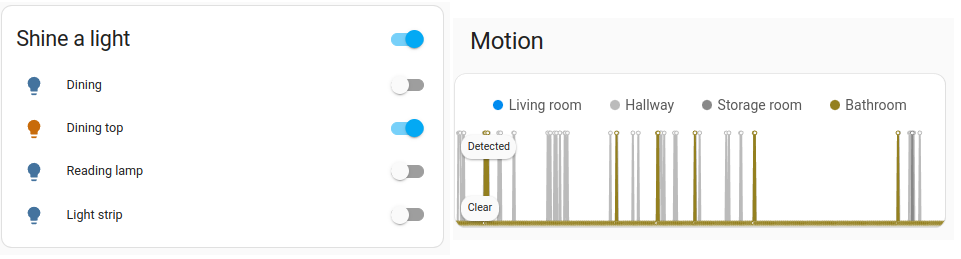
Dashboards can show a state of an entity. For example, if a light is on or off.
An automation can be triggered from a state change on an entity. For example, a motion sensor detects motion and triggers a light to turn on.
A predefined color and brightness setting for a light saved as a scene.
Automations
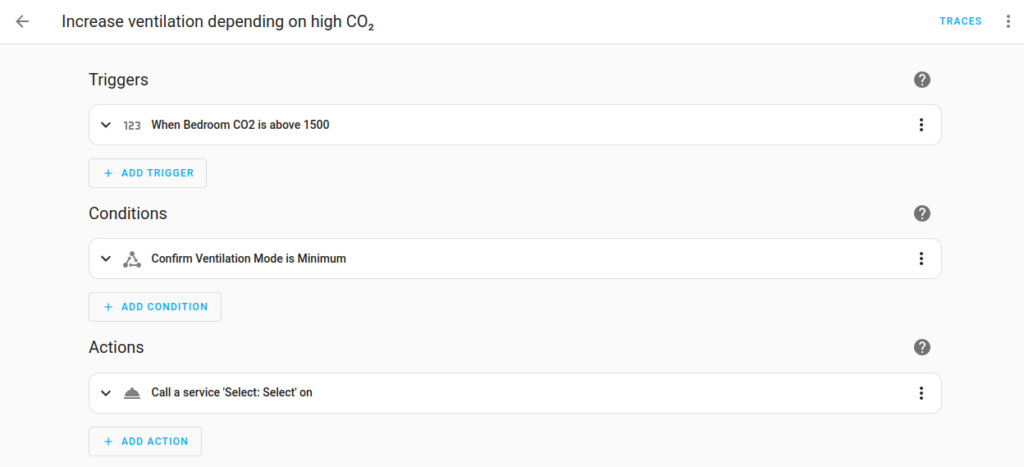
A set of repeatable actions that can be set up to run automatically. Automations are made of three key components:
Triggers – event(s) that start an automation like when the sun sets.
Conditions – optional tests that must be met before continuing to running actions. For example, if someone is home.
Actions – interact with devices such as turn on a light.
Similar to automations, repeatable actions that can be run. The difference between scripts and automations is that scripts do not have triggers like automations. This means that scripts cannot automatically run unless they are used in an automation. Scripts are particularly useful if you perform the same actions in different automations or trigger them from a dashboard. For information on how to create scripts, refer to the scripts documentation.
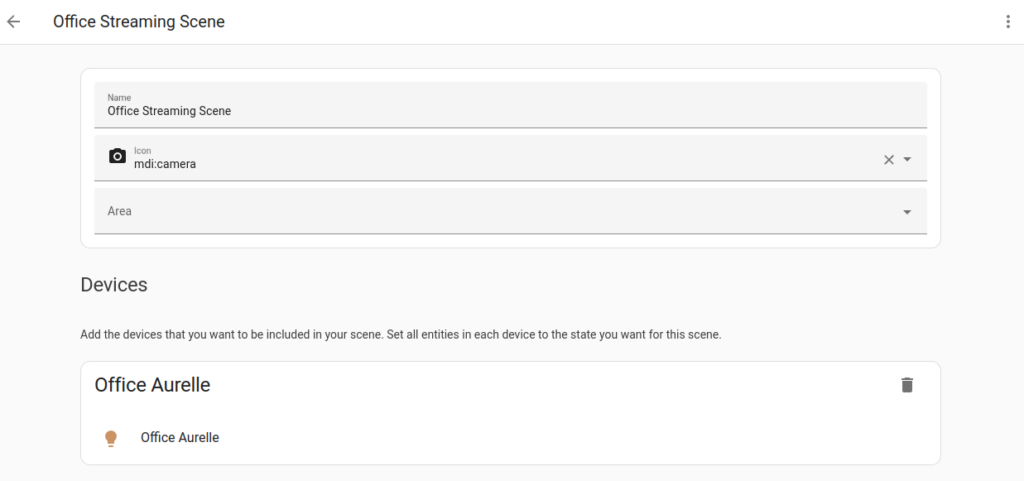
Scenes
Scenes allow you to create predefined settings for your devices. Similar to a driving mode on phones, or driver profiles in cars, it can change an environment to suit you. For example, your watching films scene may dim the lighting, switch on the TV and increase its volume. This can be saved as a scene and used without having to set individual devices every time.
To learn how to use scenes, refer to the scene documentation.
THIS IS JUST A QUICK OVERVIEW. EVERY DRIVER FROM INNOVO HAS IT’S OWN INTEGRATION NOTE THAT SHOWS HOW TO ADD THAT INTEGRATION TO HOME ASSISTANT. REFER TO THOSE INTEGRATION NOTES FOR MORE DETAILS
Let’s start by adding your first integration so that you can see and change a smart home device.
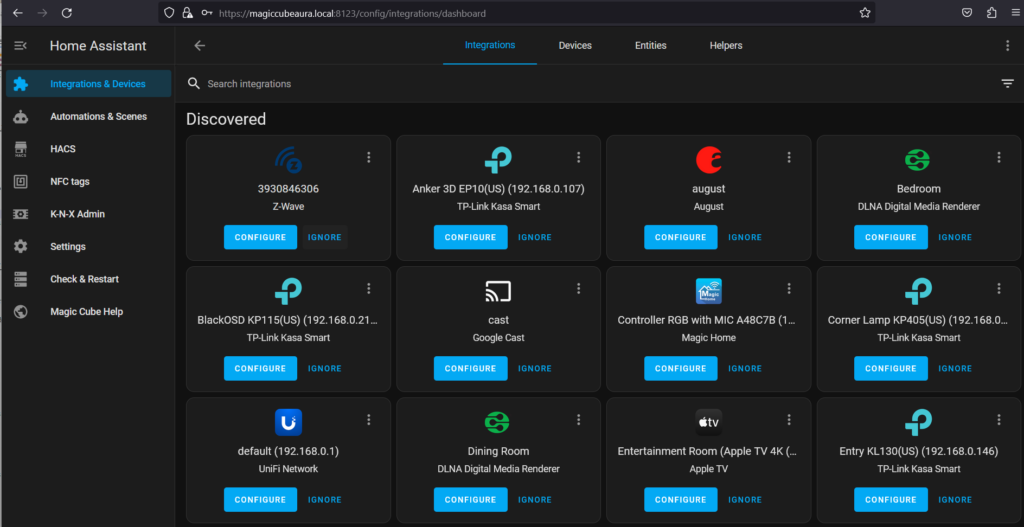
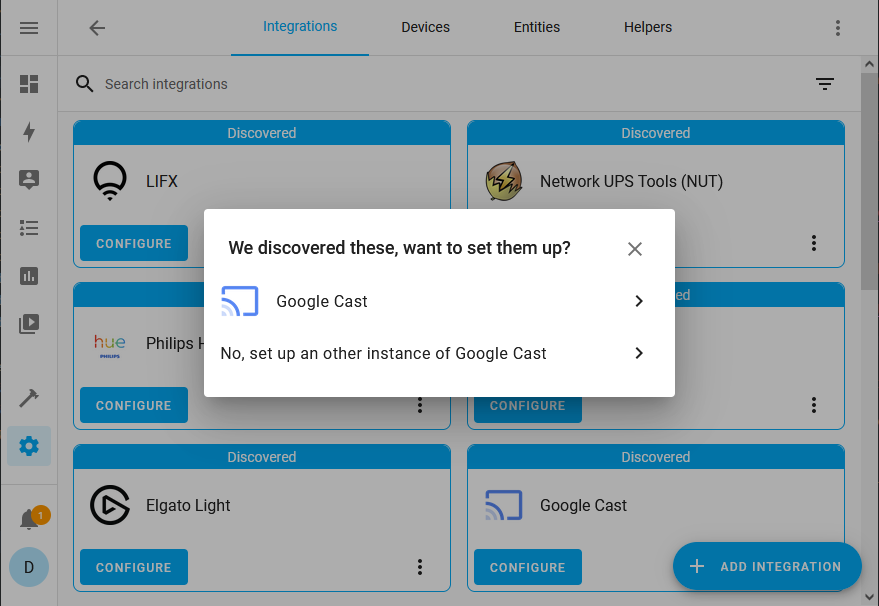
From the sidebar, click on Settings > Devices & Services. At this screen you will be able to set up integrations with Home Assistant. You might notice a discovered section. This section contains integrations that were found on your network and can easily be added with a few clicks. If your integrations are not discovered, click the Add integration button in the lower right and search for your integration in that list.
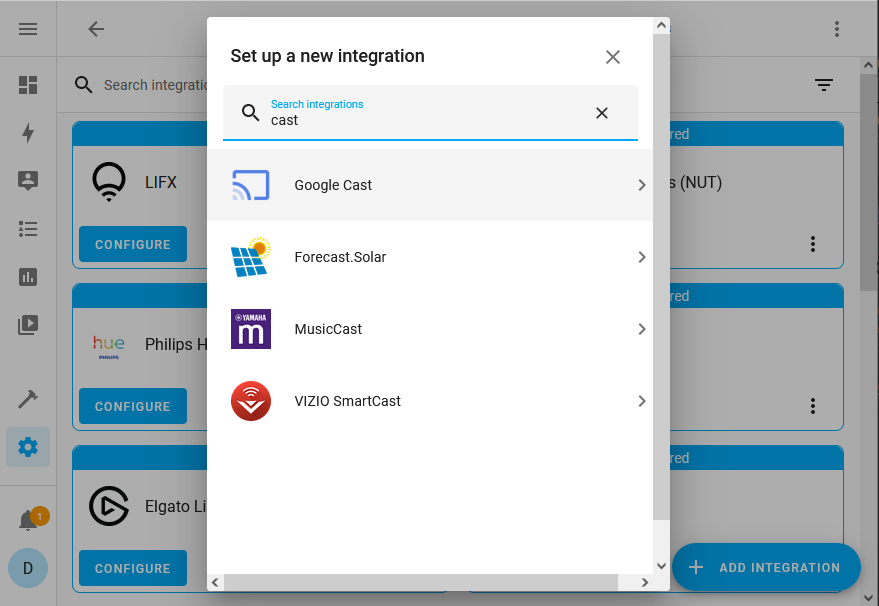
In this example, we’ll add a Chromecast to Home Assistant. Chromecast uses the Google Cast integration. Although the below example has already discovered the device, let’s add it manually.
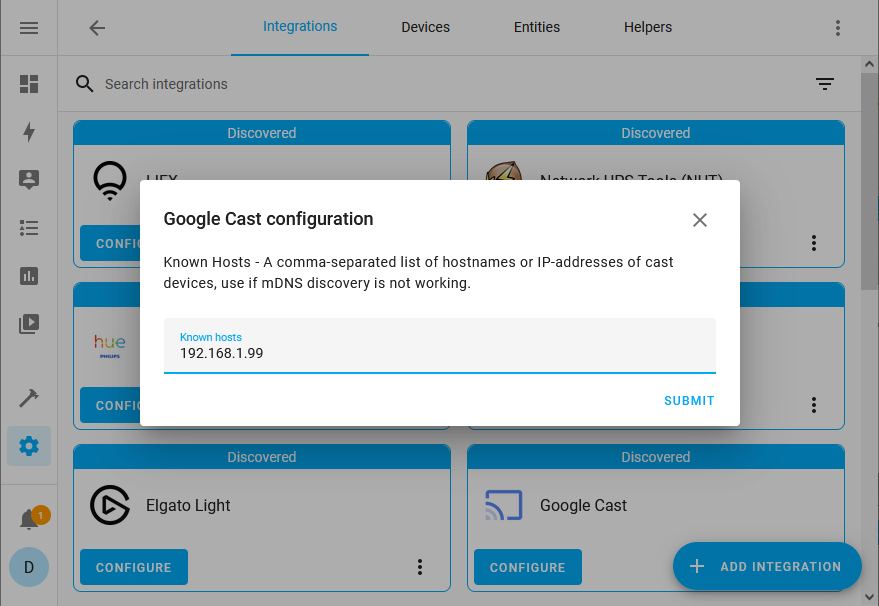
First, press the Add integration button in the lower right and search for your integration in that list.
Select Google Cast from the list. Because my Chromecast device was already discovered, it asks if I want to add the discovered one or a different one. I will choose the latter and setup another instance.
It now asks for the network IP address of the device. Describing how to identify a devices IP address is beyond the scope of this article because each network is different. However, the router is usually a good place to look. In this example, it’s 192.168.1.99.
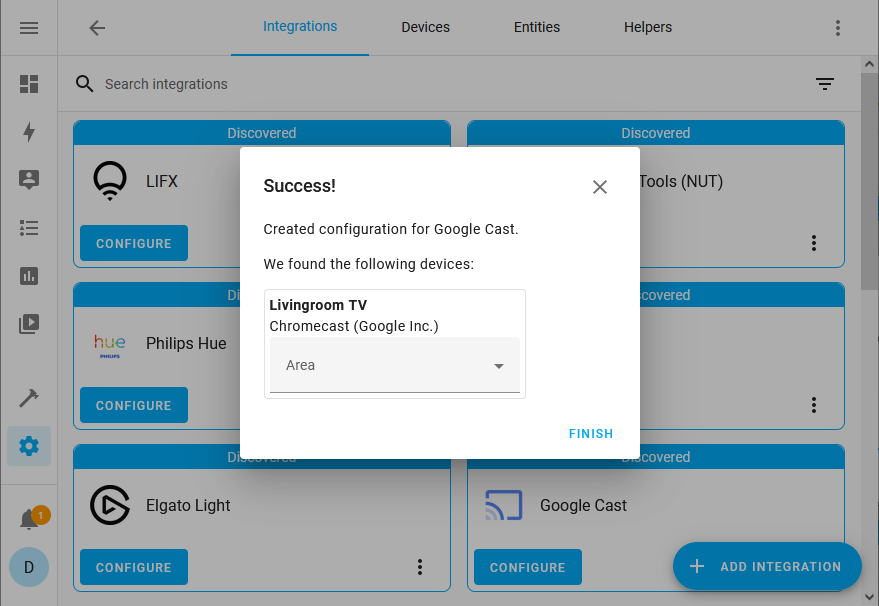
If it was successful, it will show a message and allow you to set the area it belongs to.
When you’re done, navigate back to the web interface and voila, your devices are ready for you to control. You can always go back to add and remove integrations in the future.
If you get stuck, need more information, or want to see what the setup process is like, use the integration documentation.
5.4 Automations
Automating Home Assistant
Once you add Automations to Home Assistant, they can be imported into your control system using and Input / Output Driver. You can then trigger these automations from you control system and also receive feedback if these automations have been triggered outside the control system.
Once your devices are set up, it’s time to put the cherry on the pie: automation. In this guide we’re going to create a simple automation rule to turn on the lights when the sun sets. Of course, this assumes that you have set up an integration that provides a light at this point.
In the user interface in the sidebar, click Settings > Automations & Scenes. You will now see the automation screen from which you can manage all the automations in Home Assistant.
Click the blue button at the bottom right to create a new automation. A dialog will appear. Choose Create new automation. You are presented with a blank automation screen.
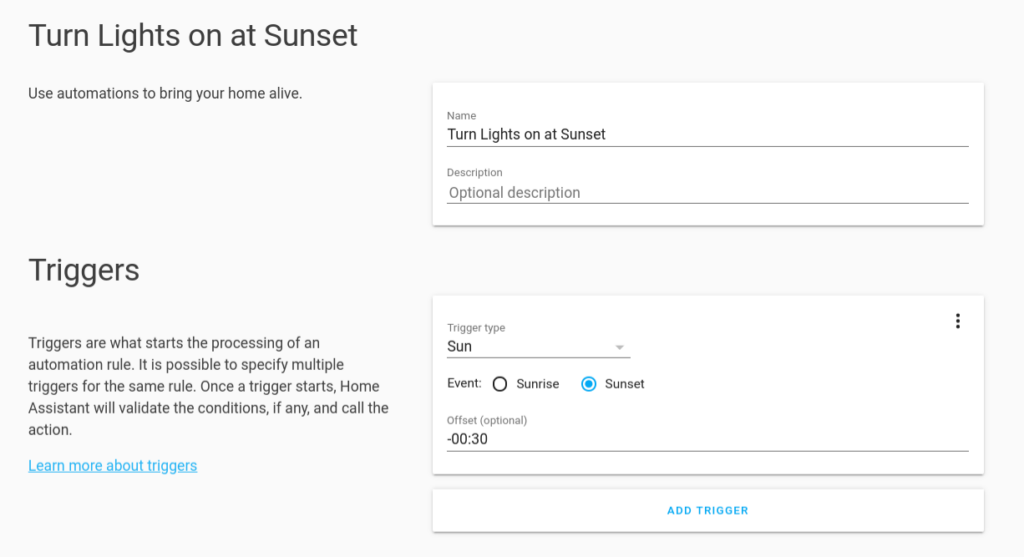
The first thing we will do is set a name. Enter “Turn Lights On at Sunset”.
The second step is defining what should trigger our automation to run. In this case, we want to use the event of the sun setting to trigger our automation. However, if we would turn on the lights when the sun actually sets, it would be too late as it already gets quite dark while it’s setting. So we’re going to add an offset.
In the trigger section, click on the dropdown menu and change the trigger type to Sun. It allows us to choose sunrise or sunset, so go ahead and pick Sunset. As we discussed, we want our automation to be triggered a little before the sun actually sets, so let’s add -00:30 as the offset. This indicates that the automation will be triggered 30 minutes before the sun actually sets. Neat!
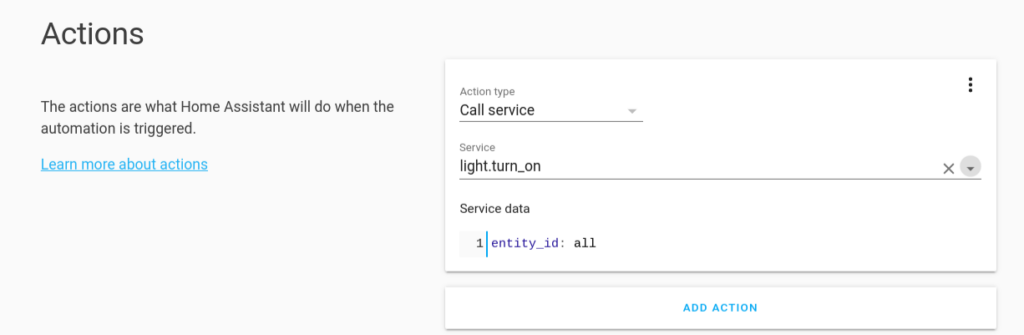
Once we have defined our trigger, scroll down to the action section. Make sure the action type is set to Call service and change the service to light.turn_on. For this automation we’re going to turn on all lights, so let’s change the service data to:
entity_id: all
YAMLCopy
Click the orange button to save the automation. Now wait till it’s 30 minutes until the sun sets and see your automation magic!
If after completing this getting started you are interested in reading more about automations, we recommend the following pages: