Trane, Nest, Lennox, IntesisHome, Hive, Airtouch, AirZone and most Climate Controls supported in Magic Cube
Driver Name
Magic Cube Climate
Driver Version
23.10.11.00
Document / Driver Revision
October 11, 2023
Core Min / Max Tested
8.7.X
2. Climate Overview
This is a two-way driver to control and get feedback from supported Magic Cube Climate Controls and TSTATs.
3. Climate Supported Features
THE FOLLOWING OPTIONS ARE SUPPORTED:
This Driver supports
Support for Innovo’s Magic Devices
Auto Discovery of all climate devices connected to Magic Cube regardless of manufacturer
Auto Discover traits of each thermostat and install based on features.
Open listen socket for faster instead of feedback
Self Healing connection monitor.
Fast LAN based operation – No internet connection required (Cloud connection required for some devices)
Auto Discovery and Installation of Magic Cube Controller
Read Feedback from the climate devices
Sync with the climate devices if changes occur outside of Elan
Supports any climate control device that works with Magic Cube
Mix and Match from different climate devices manufacturers in one driver
THE FOLLOWING OPTIONS ARE NOT SUPPORTED :
If your platform is not listed, do NOT randomly enter the brand. The values are very specific and case sensitive.Reach out to support@innovo.net before entering any values.
4. Climate Supported Devices
Airzone
CoolMasterNet
Daikin AC
Ecob
Fibaro
Heatmiser
HomeKit Device
IntesisHome
KNX
NEST
Netatmo
Sonoff
Shelly
Sensibo
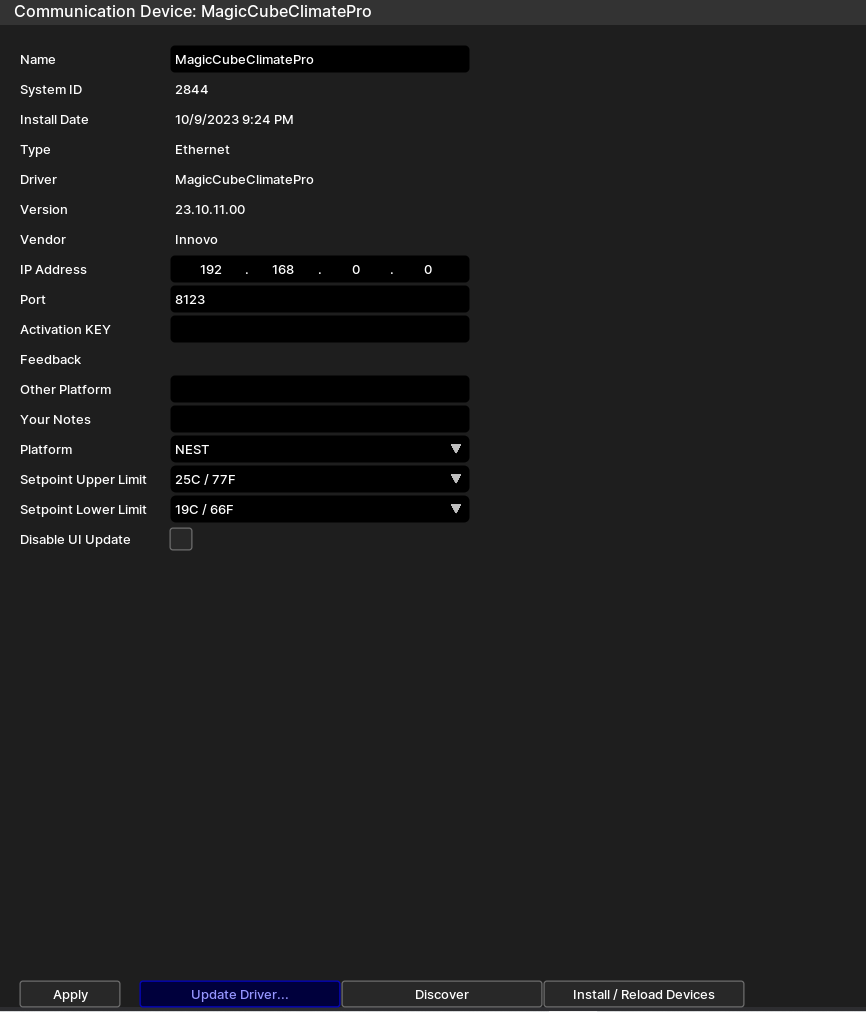
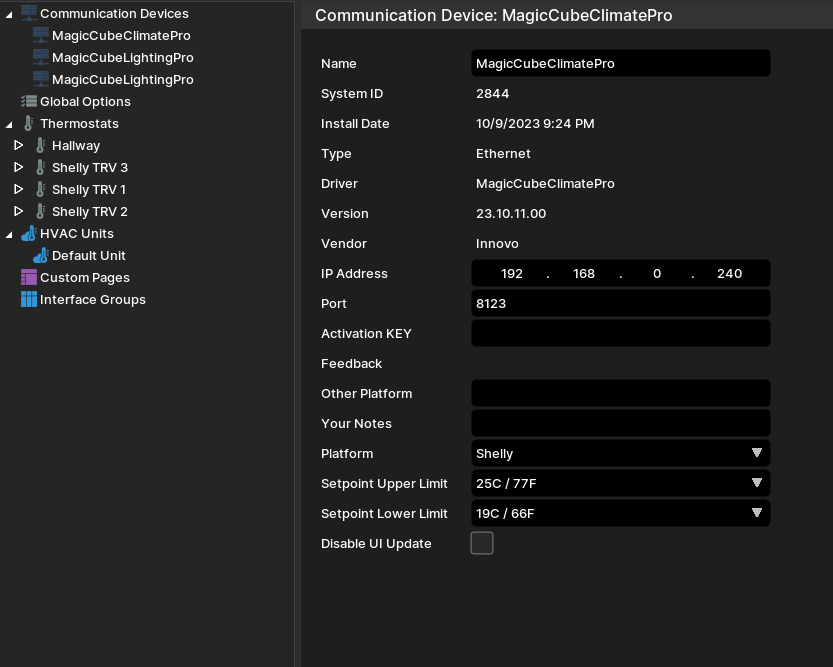
5. Climate Driver Configuration
Each Climate device is setup differently. Each device must be setup in Magic Cube on the Magic Cube first. Then the driver will automatically pick it up.
1. Nest: This is now an Elan native driver. No Magic Cube Required.
2. Trane / Nexia / American Standard:
Nexia/American Standard/Trane can be auto-discovered by the Magic Cube running Magic Cube. If an instance was found, it will be shown as “Discovered”, which you can select to set it up right away.
It is recommended that you follow the below installation process in order to ensure you are running the latest version of the [driver].
Open Climate, Communication Devices Interface, Add New Climate Communication Device.
In V2, click Import MagicCubeClimatePro driver. In V1, navigate to the folder where the driver is located and Choose the MagicCubeClimatePro driver OK
If you receive a warning that this is not a Native Elan driver, click OK
The Driver will automatically go into trial mode for 30 days. Wait for about 10 seconds and the Status will turn Green.
Add the Innovo Activation Code received in the email.
Starting with Magic Cube Aura and V5 Patch 3, you no longer need to add the token. The token is added using the Magic Cube Admin Interface. See Magic Cube User Manual
Click Apply
Click Discover, the driver will discover and populate the IP address of the Magic Cube device on the network. If the device is not discovered or you have more than one, enter the IP address manual.
From the Platform dropdown, Choose the brand of the climate you would like to install.
NOTE: You must have the brand/platform preconfigured in the Magic Cube First. See Magic Cube Manual.
NOTE: If the platform you want to install is not shown on the Platform dropdown, then reach out to support@innovo.net, the values are very specific and case sensitive. Then you can choose other from the dropdown, and in the Other Platform field write the platform you want to install.
NOTE: If you want to continue installing devices listed in the platform you should have the Other Platform field empty.
Click Install Devices. The Driver will automatically discover all climate devices connected to the Magic Cube and install them as sub drivers under Thermostats based on manufacturer.
NOTE: If you change the name of the TSTAT in Elan configurator, Click on Install / Reload to update the name.
From the Setpoint Upper/Lower Limit dropdown, you can choose the setpoint limit for your thermostats.
If you need to add more climate devices in the future, click on Install Devices.
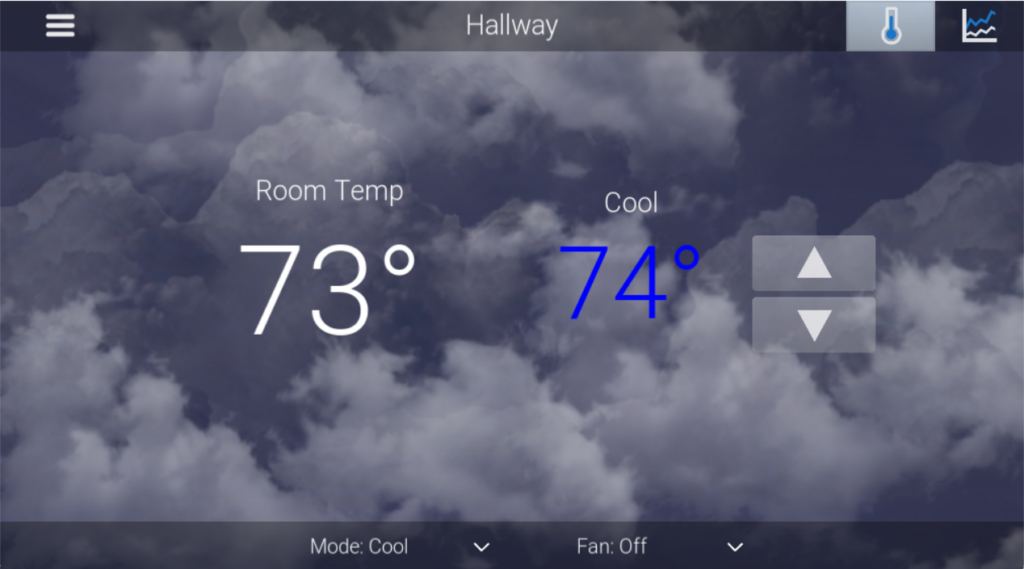
6. Climate Using the Driver
Access the Climate Device Viewer Page.
Control the features.
NOTE: If you are going to use Elan to set climate schedules, make sure to disable the scheduling features in your thermostat and vice versa
7. Climate Device Configuration
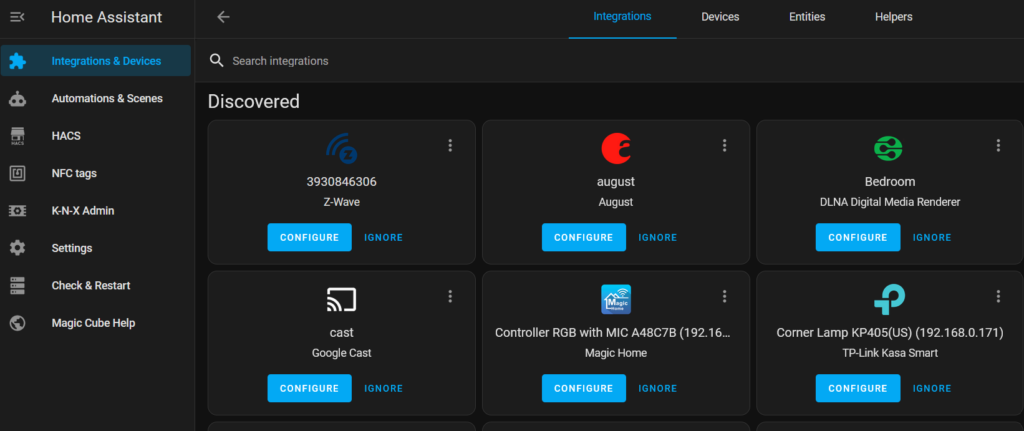
Each Climate Device configuration is different. Most are installed using Add Integration and following the prompts. The following are special cases.
7.1 General Method
Access the Home Assistant Console as described in this document.
From the left side Choose Integrations & Devices
In the Lower Right Hand Side, Click on Add Integration
Follow the prompts for each device.
7.2 Lennox Climate
Part A. Add Lennox Module to HACS
NOTE: Most Magic Cube Aura’s already have this installed. If you find Lennox Integration under HACS you can skip to part B
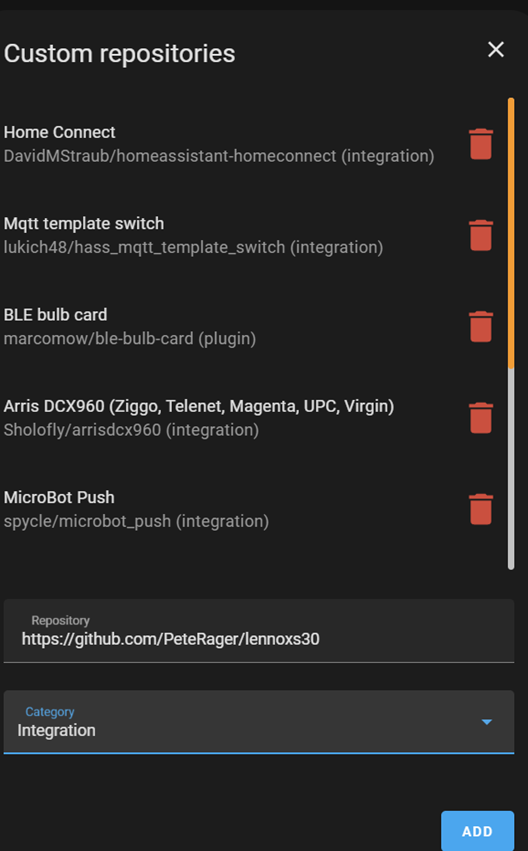
Add Custom Repository
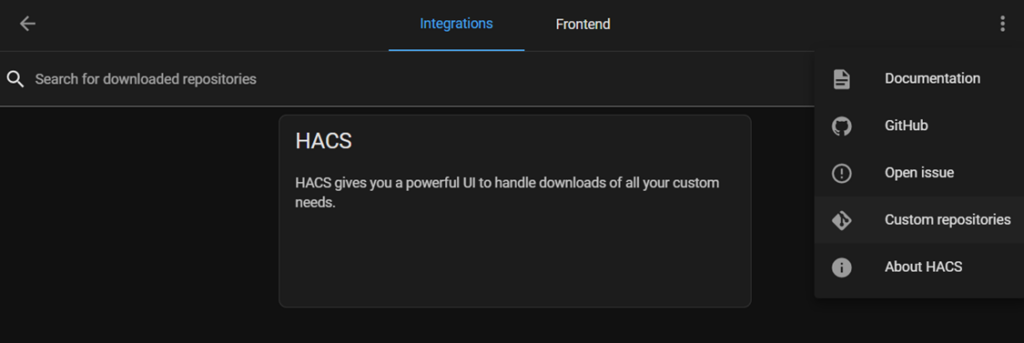
Click on HACS on the left side of the menu then Go to the three dots in the upper right corner, click on custom repository.
Under Repository enter the following and choose integration for the Type, Click Add
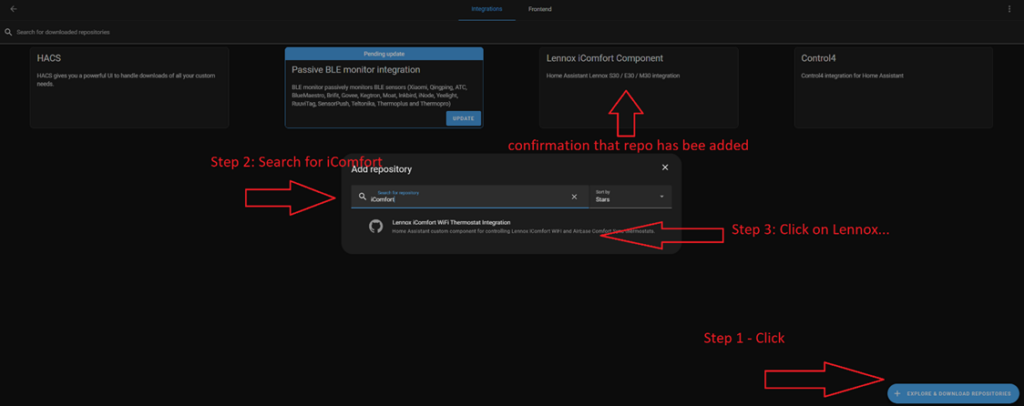
Next, add the Lennox Integration to HACS. Scroll to the bottom of the page if needed and you will see the Lennox iComfort Compenent.
Click on Explore & Download Repositories at the bottom of the screen
Click inside the search box and type iComfort.
Click on the found integration.
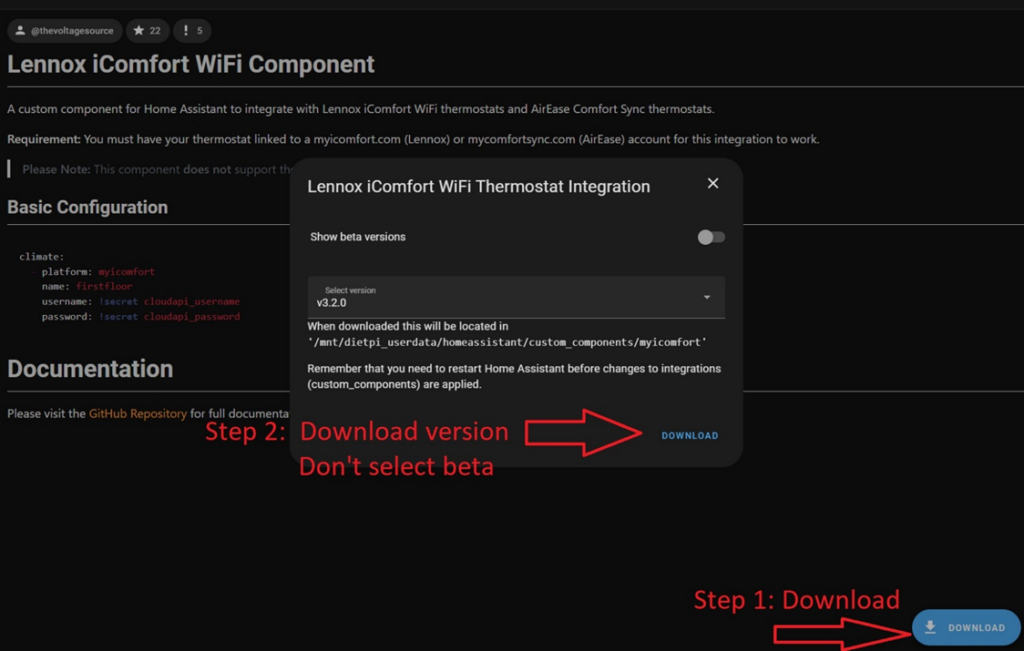
On the next page, click on download and on the Lennox popup click Download again
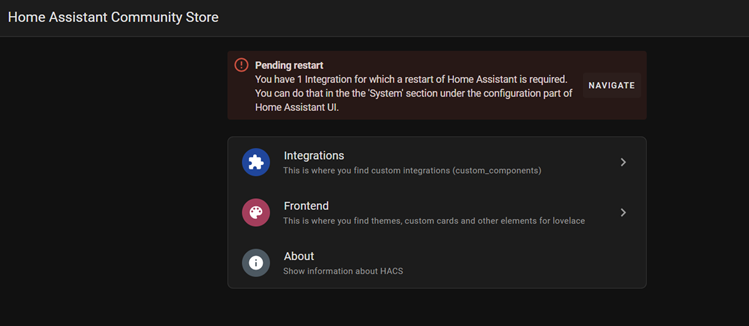
On the left side, Click on HACS again. Then Navigate, Choose Restart
When done, go to Developer Tools on the left side, then Restart Again.
Give the device about 3 minutes to completely reboot
Part 2
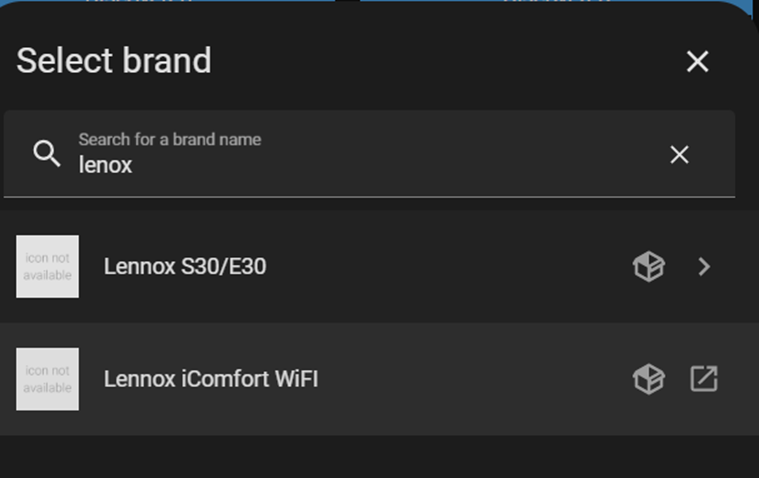
go to Settings –> Devices & Services –> Add Integration –> Search for Lennox
Note: Make sure that you have an open box next to the Module name. This means this is a HACS module. If not, restart Magic Cube and start over again.
If you’re using an S40/S30/E30 – choose the first option. If you’re using the M30, choose the second option.
For the S40/S30/E30. Follow the prompts.
Install the Magic Cube Climate driver in Elan and pull in the thermostats.
For the M30
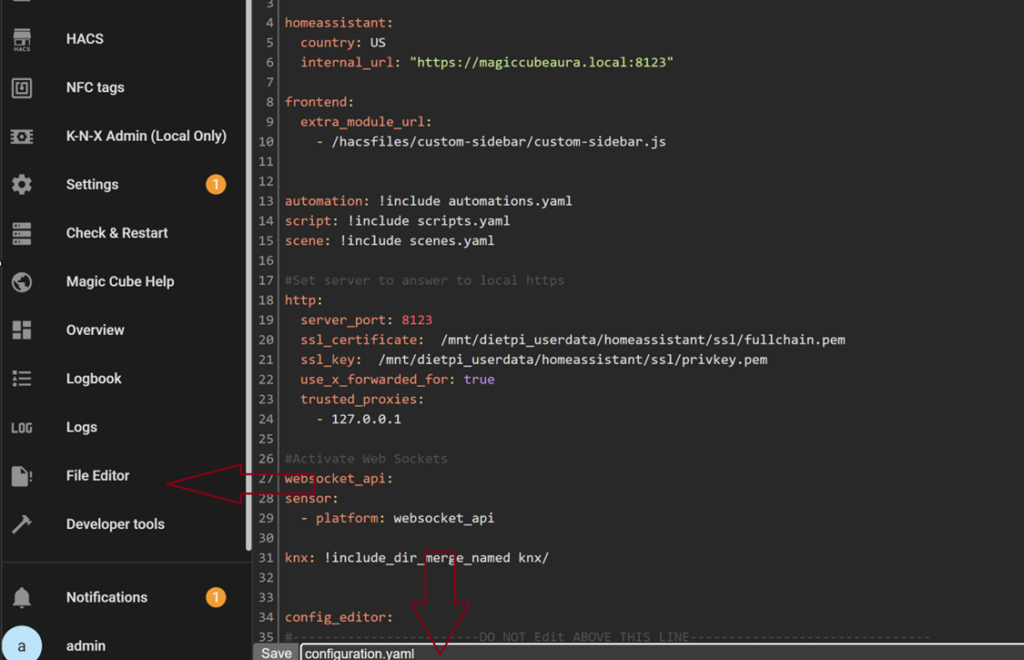
Log into Home Assistant
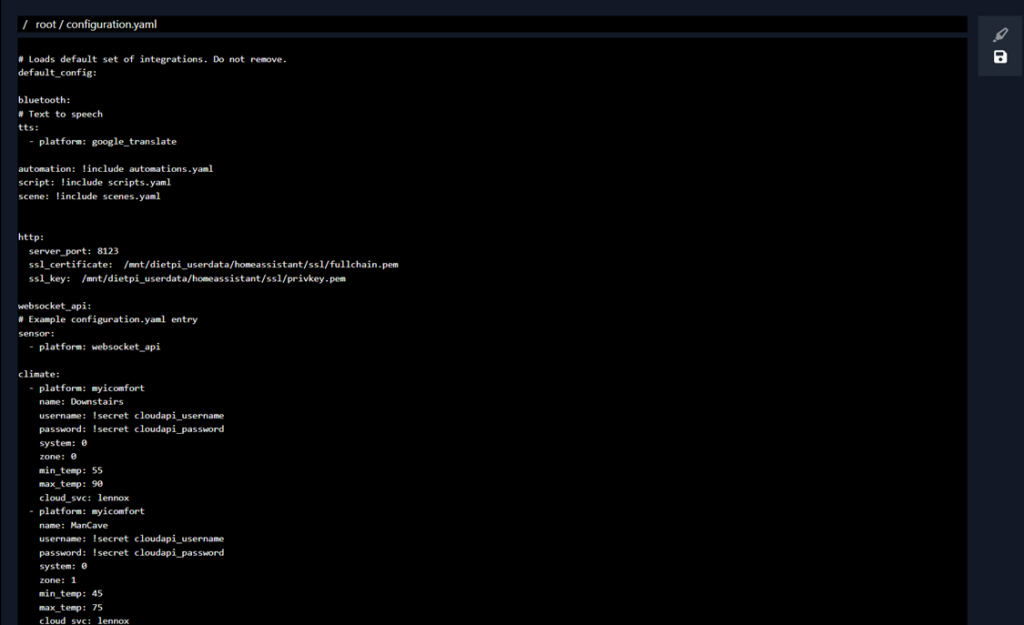
On the left click on File Editor, then select configuration.yaml. Do NOT enter anything before the warning line.
Copy and paste the following exactly as typed here at the bottom of the file. Do NOT remove / add / change anything else. Do NOT add extra spacing or tabs or line breaks. This will break the Cube. If this happens reach out to support@innovo.net
Change the information to match yours.
Change the Name to match your climate zone.
Replace the cloudapi_username and cloudapi_password with your cloud account username and password.
To add more thermostats, just add another block starting with the -platform
Click on the Save Icon on the Right hand of the screen.
THIS IS AN IMPORTANT STEP. DO NOT SKIP.
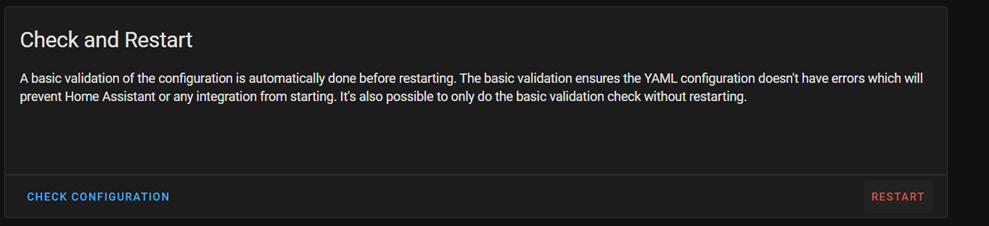
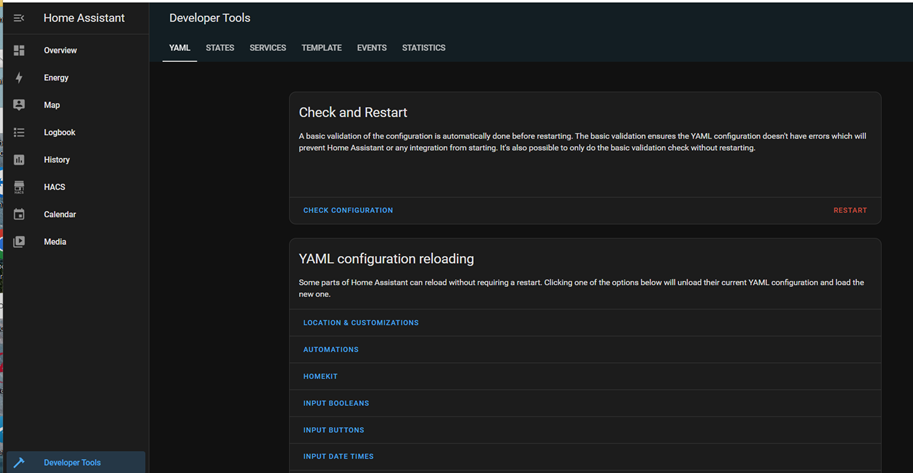
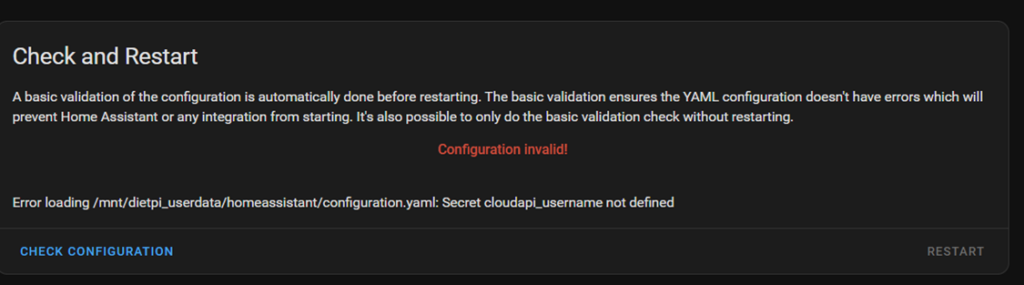
After saving the file, go back to Home Assistant, Click on Developer Tools on the bottom left hand side of the screen. Then click on Check Configuration
If you receive any red warnings such as configuration invalid, DO NOT RESTART Home Assistant. It will break.
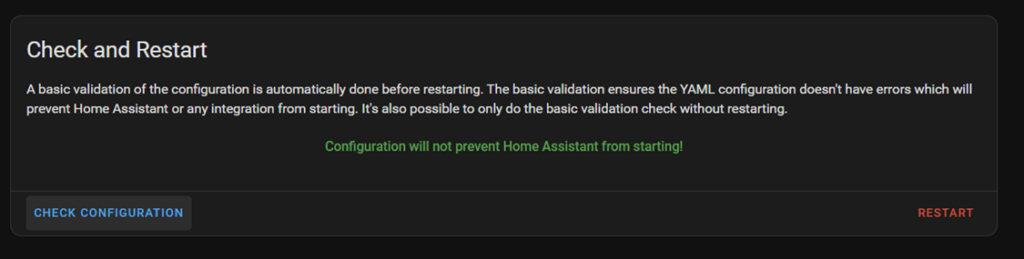
If you receive green message that says “Configuration will not prevent Home Assistant from starting!”, click on RESTART
Give the RESTART a full 3 minutes to come up and discover the thermostats.
Integration should be ready. Proceed with installing the MagicCubeClimate driver and follow that integration note.
8. Climate Known Issues
Driver not Activated. Wait 15 seconds after Apply.
Driver not discovering devices. Try discovery again. Make sure broadcasting is enabled on the network