¶ Integration Note
| Manufacturer | Innovo |
| Model | See list |
| Driver Name | MagicCubeLutronPicoPro |
| Driver Version | 24.12.04.00 |
| Document / Driver Revision | Dec 4, 2024 |
| Core Min / Max Tested | 8.8.xx |
¶ Note for Advanced Installations
This guide will take you through the basic setup of Lutron Pico and how to use it to trigger any device or action in Nice. However, you can create more functions using Home Assistant Blueprints (pre made templates). You can either do that yourself if you're an experienced Home Assistant user or we can do it for your for a nominal fee. For more advanced setup options such as using the Pico remote to dim up or down a non-Lutron light or shade or to implement single, double, press and hold, on release functions, please reach out to sales@innovo.net for a custom driver setup quote.
¶ Overview
This is a two-way driver to control and get feedback from Lutron Pico remotes. The driver will listen to any Pico Remote press and trigger the associated Event Map. The driver does not need a phantom or virtual light. Pico remotes can be used independently to trigger any device on the Nice System. The driver supports 2, 3, 4 and 5 button remotes connected to Radio RA2 Select, RA3, Caseta or QSX.
¶ Supported Features
THE FOLLOWING OPTIONS ARE SUPPORTED :
This Driver supports
- Support for Innovo’s Magic Devices
- Auto Discovery of all Pico Remotes
- Open listen socket for faster instead of feedback
- Self Healing connection monitor.
- Fast LAN based operation – No internet connection required
- Auto Discovery and Installation of Magic Cube Controller
- Mix and Match from different lighting manufacturers in one driver
Supported Devices:
|
RA2 Select RA3 Caseta QSX |
¶ Device Configuration
Lutron Caséta, RA2 Select, RadioRA 3, and Homeworks QSX (not QS) can be auto-discovered by Home Assistant (they are all under one integration).
If an instance was found, it will be shown as Discovered. You can then set it up right away.
To add the Lutron Pico Integration, click below (Must be local the Magic Cube and have Home Assistant open and logged in)
¶ Auto Setup
From the left menu in the Magic Cube Home Assistant page, click on Integrations & Devices or From Settings > Devices & Services
Lutron will be auto-discovered, click on Configure and follow the steps to pair.
¶ Manual Setup
If it wasn’t discovered automatically, You can set up a manual integration entry:
Browse to your Magic Cube Home Assistant instance.
Go to Settings > Devices & Services.
In the bottom right corner, select the Add Integration button.
From the list, select Lutron Caséta.
Follow the instructions on screen to complete the setup.
- The driver relies on static IP address for each Magic Cube device. Assign Static IP address using DHCP reservations in your router. If device IP address changes, then change it manually in the Elan Configurator
- Starting with Magic Cube Aura and V5 Patch 3, you no longer need to add the token. The token is added using the Magic Cube Admin Interface. See Magic Cube User Manual
¶ Driver Configuration
¶ Installation Process
It is recommended that you follow the below installation process in order to ensure you are running the latest version of the [driver].
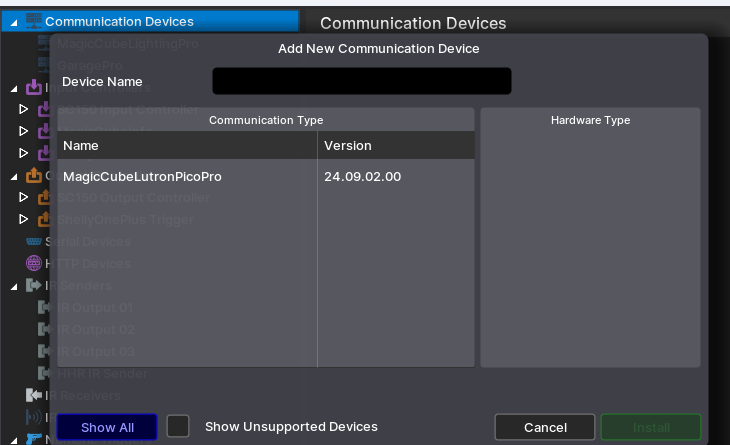
- Open Input/Output, Communication Devices, Add new Communication Device.

- In V2, click Import MagicCubeLuronPicoPro driver. In V1, Navigate to the folder where the driver is located and Choose the MagicCubeLuronPicoPro driver OK.
- If You receive a warning that it is not a Native Elan driver, click OK.
- The Driver will automatically go into trial mode for 30 days. Wait for about 10 seconds and the Status will turn Green.
- Add the Innovo Activation Code received in the email.
- Starting with Magic Cube Aura and V5 Patch 3, you no longer need to add the token. The token is added using the Magic Cube Admin Interface. See Magic Cube User Manual
- Click Apply
- Click Discover, the driver will discover and populate the IP address of the Magic Cube device on the network. If the device is not discovered or you have more than one, enter the IP address manual.
- Click Install Devices. The Driver will automatically discover all Lutron Pico devices connected to the Magic Cube and install them under inputs as sub-drivers based on the manufacturer.
¶ Event Maps
Create event maps to control any device on your system when a Pico Button is triggered.
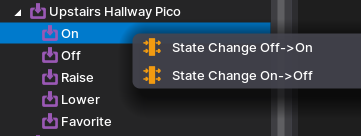
Right Click on the Pico Button > Add Event Map > State Change Off >On
Note: State Change On > Off is not used. Do NOT add event maps for this trigger.

¶ Using the Driver
- Add an interface to track the devices. Go to interface add a new custom page, add indicator variables.
- Connect the Elements to the proper variable in the driver.
¶ Troubleshooting
- Driver not Activated. Wait 15 seconds after Apply
- Driver not discovering devices. Try discovery again. Make sure broadcasting is enabled on the network
- Driver not controlling light but it’s working from Magic Cube. Make sure the IP address didn’t change. Assign DHCP reservations for the devices.