¶ Integration Note
| Manufacturer | NetX Thermostat |
| Model | WiFi Enabled & Ethernet Enabled Thermostats |
| Driver Name | NetX Thermostat |
| Driver Version | 25.05.24.00 |
| Document / Driver Revision | May 24, 2025 |
| Core Min / Max Tested | 8.8.xx |
¶ Overview
This is a two-way driver to control and get feedback from the NetX Wi-Fi and Ethernet enabled thermostats. The driver uses local control. No cloud access is needed to operate the thermostat from Elan.
The Elan controller is capable of controlling, querying and providing feedback for multiple NetX units.
¶ Supported Features
THE FOLLOWING OPTIONS ARE SUPPORTED :
- Auto-discovery of all thermostats
- Auto installation of all thermostats
- Dynamic mode detection and installation
- Two-way control and feedback of setpoints and fan modes
- Control Heat / Cool / Auto / Off modes
- The driver supports multiple devices
- Heal connections with heartbeat
- Detect Temp and Humidity Sensors
- Provide data points for Temp and Humidity for each thermostat.
- Maintain 2 F / 1C Degrees of Separation in thermostats
23.03.24.00
- Add 2F/1C separation between heat and cool
- Add active state for heating/cooling
- Faster detection of offline status
- Driver gives a yellow warning when the thermostat is offline
25.02.28.00
- Improved self-healing and heartbeat functions
- Fixed driver timeout
25.05.24.00
- Dehumidification Control Dropdown list.
- To control humidity, the dropdown value must not be set to 'None'.
¶ Device Configuration
- Setup the device according to manufacturer’s instructions.
- Connect the thermostat to the network and create a DHCP reservation or set a static IP address for each thermostat. If the IP address changes on the thermostat, operation from Elan will break.
- Set the name of the TSTAT in the web interface first before discovering and installing in Elan. See NetX installation guide for general network connection and set up.
- Make sure the name does NOT exceed 15 characters
- Make sure the name contains NO spaces
- By default, when the driver is installed, it will disable the schedules on all TSTATs. If you wish to re-enable the schedules on the TSTATs
- Disable scheduling in Elan
- Set the Operation Mode to Schedule then click Apply, then Discover / Install.
- Set the same username and password for all thermostats on the network. The user name must be a valid email address. The email address is required to register the thermostat, receive weather information, and for the NetX thermostat ecosystem to send disconnect messages. These items are done outside of the Elan driver. They are part of the NetX thermostat.
¶ Driver Configuration
¶ Installation Process
IMPORTANT NOTE:
It is recommended that you follow the below installation process in order to ensure you are running the latest version of the [driver].
- Unzip and Extract all EDRVC Files from downloaded file into the Driver Installation folder.
- Open Climate, Communication Devices, Add New Communication Device
- Navigate to the folder where the driver is located and Choose the NetX Thermostat.
Note: If the driver doesn’t appear under the Communication Type then make sure that the NetX Thermostat driver is extracted to the same folder where all the other drivers are installed from. It’s good practice to create one folder on the computer where all the third party EDRVC files live.
- Note: If the driver still does not appear, do the following:
- Extract the downloaded zip file to you EDRVC folder (the folder where all custom EDRVC drivers live)
- Go to Thermostat, then add a NetX Thermostat driver. Then Delete it.
- Now go back to Communications device, Add, Check the box the says show unsupported devices, the Driver should show up on the bottom.
- You’ll receive a warning that this is not a Native Elan driver, click OK

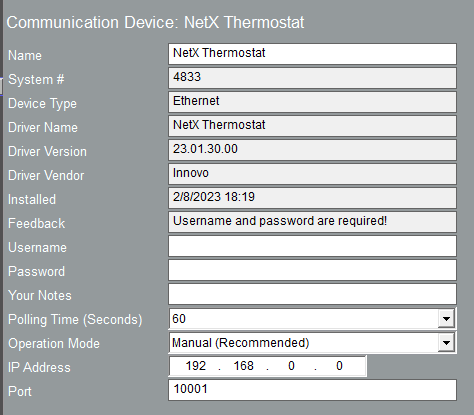
- Fill in the username and password for the thermostat
- All thermostats must on the network must have the same username / password.
- Keep Operation Mode set to Manual if you want Elan to manage schedules
- This setting will override the web interface. To enable schedules back, change this setting to Schedule and hit Apply, then Disocver/Install.
- If you must change the port number, make sure to match it in the thermostat’s web interface.
- Ignore the IP address field. It is not used

- Now Click Discover / Install to install all thermostats found on the network
- Each thermostat will be installed using it’s name and IP address.
- Set the Heat / Cool as needed.

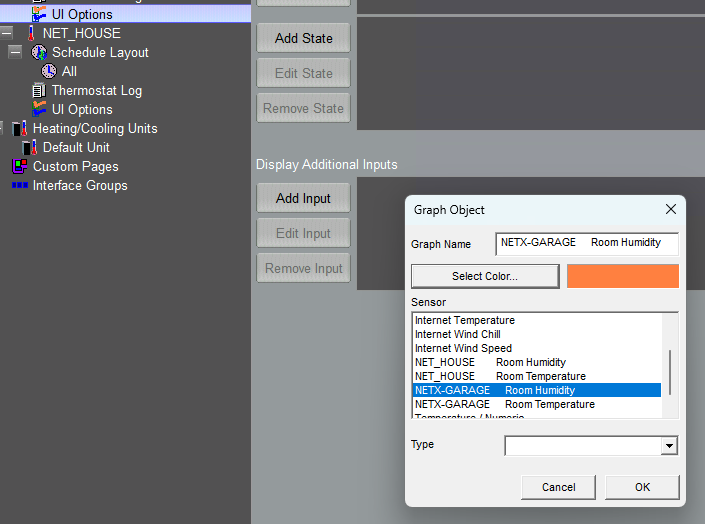
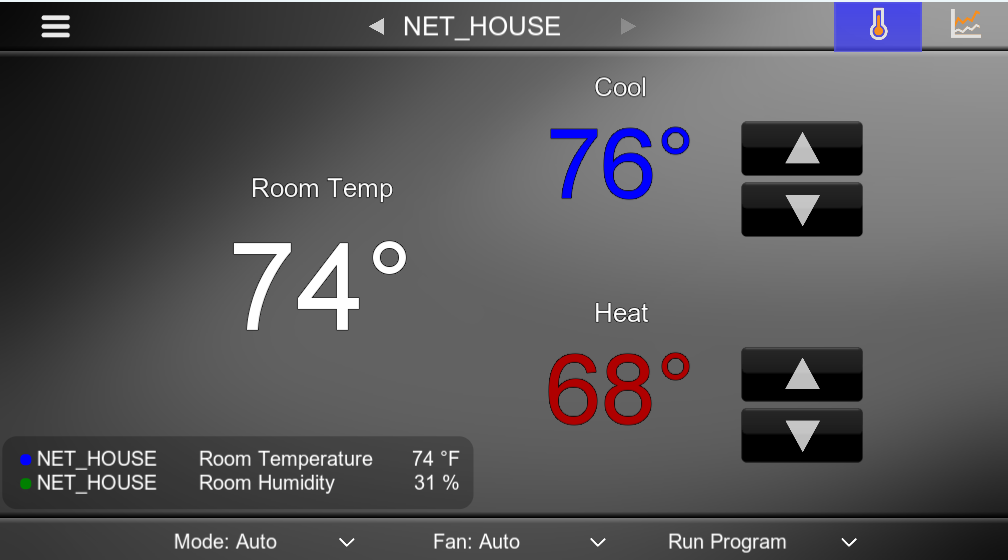
- To Add Temp / Humidity to UI
- Click on UI Options
- Add the Inputs

¶ Using the Driver
The driver uses the Native Elan Climate Interface. Turn the system on / off and schedule from the interface.
